


This article is part of a series about Amazon Verified Permissions:
- Part 1 — Essentials
- Part 2 — Integration with your app
- Part 3 — Integration with Amazon Cognito
- Part 4 — Complete Example
- Part 5 — Integration with AWS CloudTrail
Building authentication for an application is a straightforward process. However, the complexity arises when you need to incorporate fine-grained authorization, such as different user roles or attribute-based access control. The business logic can already be intricate, and when combined with authorization logic, it can quickly become overwhelming. But what if you could separate your authorization logic from your application logic? Or use the same audit trail for both your app and infrastructure? Amazon Verified Permissions is an answer to all these needs!
This newcomer, generally available since June 13, 2023, is an exciting option. It is also evolving fast, with the latest additions like enhanced visual mode and batch authorization. In this series of articles, I’ll guide you through this service. In this first part, we’ll cover the essentials, schema design, and policy language. The following articles will explore how to call the service from your application to make authorization decisions. We are also applying the knowledge gathered to build a fully working GraphQL API with Amazon AppSync service and integrate it with Amazon Cognito and Amazon Verified Permissions to support role-based access control. Finally, we look at the CloudTrail integration, which offers audit trail capabilities.
I will reference an imaginary custom application throughout the article series. This application is a hero management system that is used to manage superheroes. The two most essential personas are the admin persona, which can add heroes to the system, and the user persona, which can list the heroes without revealing their true identity, the name attribute.
What is Amazon Verified Permissions?
Amazon Verified Permissions is a fully managed and scalable authorization service that contains the control plane; you can define fine-grained authorization policies with open-source language Cedar and the data plane or “the engine” to query for authorization decisions. With AVP, you can standardize and centralize policy management, administration, and audit. Essential concepts are policy store, schema, and policies. Cedar itself was first introduced with AWS Verified Access service, generally available since April 28, 2023, in preview during AWS re:Invent 2022. AWS Verified Access is out of the scope of this article series, but you can look at a blog post about it on the AWS Security Blog.
AWS Identity and Access Management (IAM) vs. Amazon Verified Permissions
Verified Permissions should not be mixed with AWS Identity and Access Management (IAM). AWS IAM manages identities and access to AWS services and resources. This could be access to AWS accounts and inside accounts to different services and their resources. Amazon Verified Permissions is a permissions management and authorization service for custom applications you built.
Policy Store
The policy store is a container for your policies. It also includes a schema that validates the policies you add to the store. The policy validation mode controls this behavior. Amazon recommends creating one policy store per application or one per tenant for multi-tenant applications. This approach ensures that your policies are organized and easily manageable, enhancing the efficiency of your authorization process.
Deploy with Terraform
Terraform example of policy store creation with hashicorp/aws provider:
resource "aws_verifiedpermissions_policy_store" "store" {
  validation_settings {
    mode = "STRICT" // validate against the schema
  }
  description = "Hero App Policy Store"
}
Schema
The schema is a declaration of the structure of the entity types and actions your application supports for authorization decisions. Entity types can be further divided into principals and resources — principals can take one or more actions on a resource. Entity types can also have attributes to support attribute-based access control (ABAC), and entity types can be members of other types to support grouping or, for example, role-based access control (RBAC) — more detailed information in Cedar documentation.
The schema is defined in a JSON format, but AWS Console also provides a graphical tool for building and visualizing the schema.
Example for our Hero application:
{
  "HeroApp": {
    "entityTypes": {
      "User": {
        "memberOfTypes": ["Group"],
        "shape": {
          "type": "Record",
          "attributes": {}
        }
      },
      "Group": {
        "shape": {
          "type": "Record",
          "attributes": {}
        }
      },
      "Hero": {
        "shape": {
          "type": "Record",
          "attributes": {
            "rating": {
              "type": "Long"
            },
            "region": {
              "name": "Region",
              "type": "Entity"
            }
          }
        }
      },
      "Region": {
        "shape": {
          "type": "Record",
          "attributes": {}
        }
      }
    },
    "actions": {
      "AddHero": {
        "appliesTo": {
          "principalTypes": ["User", "Group"],
          "resourceTypes": ["Hero"]
        }
      },
      "GetHero": {
        "appliesTo": {
          "principalTypes": ["User", "Group"],
          "resourceTypes": ["Hero"]
        }
      },
      "ListHeroes": {
        "appliesTo": {
          "principalTypes": ["User", "Group"],
          "resourceTypes": ["Hero"]
        }
      }
    }
  }
}
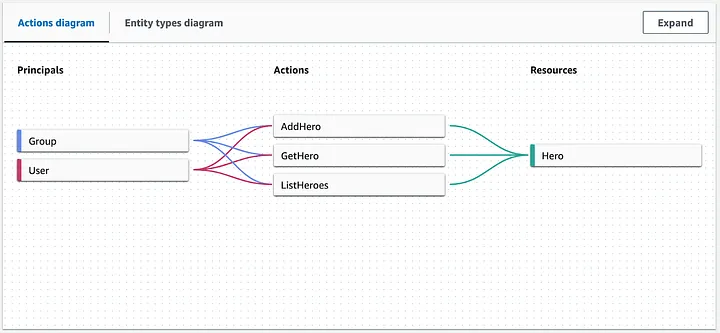
The example shows that our application supports three different actions: AddHero, GetHero, and ListHeroes. A single user or a user group member can take these actions on Hero entities. HeroApp, at the root level, is a namespace definition. A namespace is a string prefix for a type, separated by a pair of colons (::) as a delimiter in the policies. Verified Permissions supports one namespace per policy store to prevent ambiguity.
The visual mode in the AWS console would be similar to this:
Deploy with Terraform
Terraform example of schema creation with the same hashicorp/aws provider:
resource "aws_verifiedpermissions_schema" "schema" {
  policy_store_id = aws_verifiedpermissions_policy_store.store.id

  definition {
    value = file("../policies/schema.json")
  }
}
The schema.json file contains our example schema, which is shown above.
Policy
A policy is a statement that either permits or forbids a principal to take one or more actions on a resource. We could have a policy, for example, an admin group, to allow all actions, including AddHero:
permit (
    principal in HeroApp::Group::"Admin",
    action in [
        HeroApp::Action::"AddHero",
        HeroApp::Action::"ListHeroes",
        HeroApp::Action::"GetHero"],
    resource
);
And a policy for user groups to allow only get actions:
permit (
    principal in HeroApp::Group::"User",
    action in [HeroApp::Action::"ListHeroes", HeroApp::Action::"GetHero"],
    resource
);
Note that in these examples, we don’t have any restrictions on the resource, in this case, the Hero entity, which has some attributes defined in our schema: rating and region. With these, we could define even fine-grained permissions to limit actions for heroes in a specific region. Resources could also be restricted to a single resource (by an identifier, for example) or a group of resources. Still, the schema does not support any hero groups at the moment.
Let’s create an EMEA admin policy with a when-condition:
permit (
    principal in HeroApp::Group::"EmeaAdmin",
    action in [
        HeroApp::Action::"AddHero",
        HeroApp::Action::"ListHeroes",
        HeroApp::Action::"GetHero"],
    resource
)
when {
    resource.region == HeroApp::Region::"EMEA"
};
Attribute could be something the principal has, but in our case, no attributes are defined for User or Group entities.
You can also explicitly deny access (in this example for user identifier “a2701ad0–5ed1–468d-b779–6eb8e594b6fd”) with the forbid keyword:
forbid (
    principal == HeroApp::User::"a2701ad0-5ed1-468d-b779-6eb8e594b6fd",
    action in [HeroApp::Action::"AddHero"],
    resource
);
More policy examples can also be found in AWS documentation.
Context
Context is the information relevant to policy decisions but not part of the identity of your principal, action, or resource. Context attributes could be connection-related data like IP source address or whether the user has used multi-factor authentication (MFA) during the authentication process. You can add this to your authorization requests, but let’s go back to this in later articles. Context attributes also need to be modeled to actions in the schema.
Example of policy using the context attribute:
permit (
    principal in HeroApp::Group::"User",
    action in [HeroApp::Action::"ListHeroes", HeroApp::Action::"GetHero"],
    resource
)
when {
    context.MultiFactorAuthPresent == true &&
    context.NetworkInfo.IPAddress like "192.0.2.*"
};
Deploy with Terraform
Unfortunately, the hashicorp/aws provider doesn’t support policies at the time of writing (besides the policy templates), so we need to use another approach. You can use the aws_cloudformation_stack resource or a different provider like AWS Cloud Control API based on hashicorp/awscc.
With awscc, we can quite handy define the policies as code:
resource "awscc_verifiedpermissions_policy" "admin_policy" {
  policy_store_id = aws_verifiedpermissions_policy_store.store.id
  definition = {
    static = {
      statement   = file("../policies/admin_policy.cedar")
      description = "Admin Policy"
    }
  }
}
Where our first admin policy example would be located in the admin_policy.cedar file.
Policy Templates
Policy templates are reusable policy blueprints with placeholders for the principal, resource, or both. This allows the policy to be defined once and then attached to multiple principals and resources. Updates to the template are reflected across all principals and resources that use the template. Policies linked to a policy template are called template-linked policies, while examples in the policy section are called static policies.
Example:
permit(
    principal == ?principal,
    action in [
        HeroApp::Action::"Add",
        HeroApp::Action::"Get",
        HeroApp::Action::"List"
    ],
    resource == ?resource
);
Testing the policies with the Test bench console
The Test Bench is a feature of AVP that allows you to test and troubleshoot the policies by making authorization requests. You can use the visual mode or a JSON document mode in the AWS Console:
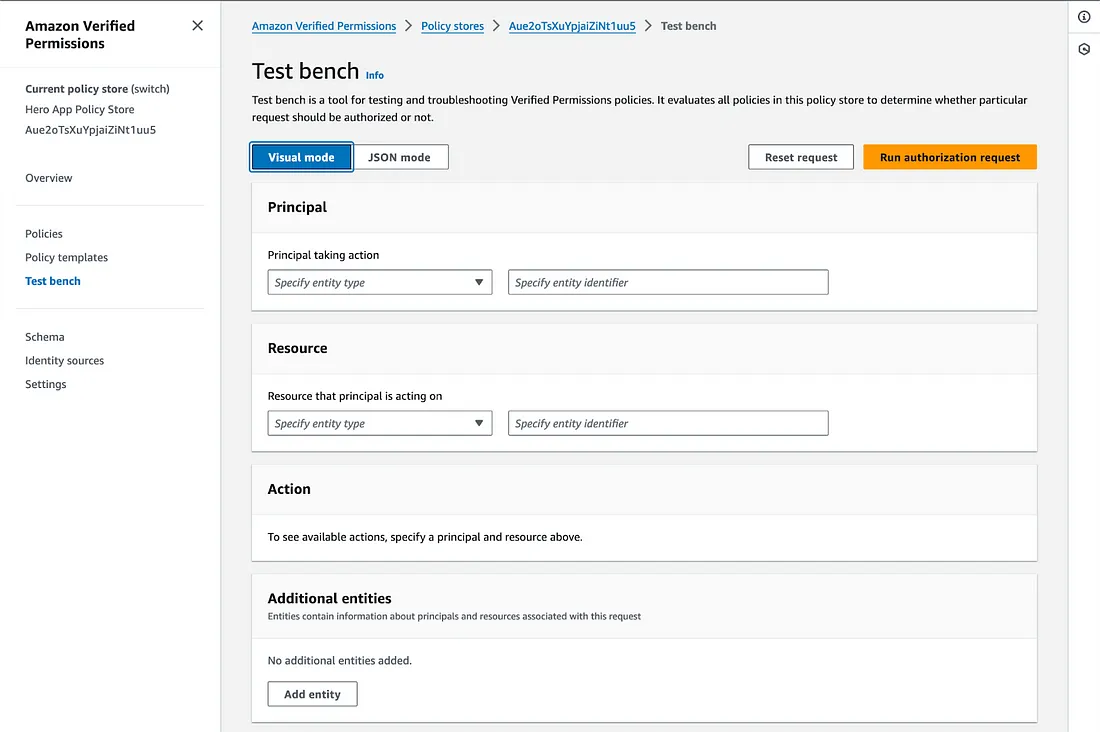
Let’s have a quick test and try to add a hero with our user role, with visual mode and filing in the following:
Principal:
- HeroApp::Group = User
Resource:
- HeroApp::Hero = 825837ac-2023–4aff-afc8-a39787b70e5c (user identifier)
Attributes:
- region: Entity HeroApp::Region = NA (region identifier, North America)
- rating: Long = 5
Action:
- HeroApp::Action = AddHero
Additional entities:
- HeroApp::Region = NA (North America)
Note that because our Hero references another entity region, we must also define that one in the additional entities section. After pressing the “Run authorization request” button, we see the deny response as expected:

If we change only the group to Admin, we get the allowed response as expected:
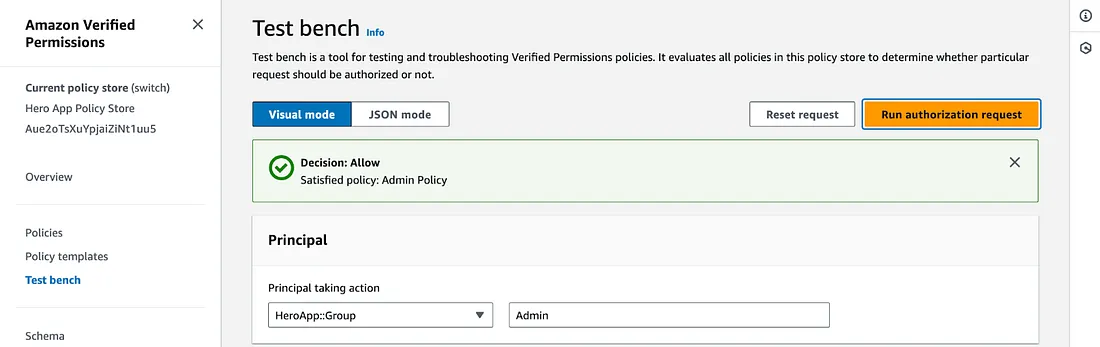
Note that the test bench reports also the policy that satisfied the allowed decision. In this case, the Admin Policy.
Conclusion
In this article, we covered the essential building blocks of Amazon Verified Permissions to get started with schema and policy design and how to test policies with the test bench feature. We also covered code snippets for Terraform to deploy all the needed pieces with infrastructure as a code approach. In the next article, we will integrate the Amazon Verified Permissions service with different strategies, so stay tuned!
Continue reading: Part 2 — Integration with your app
–