Managing the permissions for different user groups can be a burdensome task even with a small amount of data. If your data includes sensitive data then this task becomes even more complex since you have to have different versions of the data depending on who has access to what parts of it.
This blog post will showcase a demo of how you can use AWS Lake Formation to set up a data lake on AWS and manage access to the data on column and even row levels. First, we’ll go through the infrastructure and services used and then take a look at how you can control access to data.
What will be covered in this post
- Differences between IAM and AWS Lake Formation
- Overview of the demo’s data pipeline
- Lake Formation concepts
- Tutorial on how to manage permissions with Lake Formation
- Different access control models in Lake Formation
Differences and Similarities Between IAM and Lake Formation
IAM and AWS Lake Formation share some similarities when it comes to granting permissions to resources in an AWS environment. The key differences are in the scope and purpose of the permission.
IAM can be used to give access to virtually every AWS service and resource in your environment on the API level. Lake Formation, on the other hand, can manage the permissions to specific resources like tables in the AWS Glue Data Catalog or objects in S3 buckets. Another difference between the two services is that while IAM can give access to an S3 bucket, Lake Formation can give the user access to specific rows in the data that’s in the bucket.
The two services are powerful tools for managing the access users have to your AWS resources, but it is important to know the use cases for both of them. You use IAM to give users and roles general permissions to different AWS services. AWS Lake Formation is best used in a data lake environment for data governance and managing data access on much finer granularity than IAM.
Overview of the Infrastructure & Dataset
The demo in this blog post is built and deployed using Terraform, but all the services can be set up using other IaC solutions, AWS CLI, or the AWS Management Console. Everything used to build this demo can be found in this GitHub repository: https://github.com/NordHero/aws-glue-kinesis-lake-formation-demo
For the data used in the demo, I used a publicly available dataset by Daqing Chen. The dataset contains transactions from an online retail store. For further information about the transaction data, see the following link: https://archive.ics.uci.edu/dataset/352/online+retail. The dataset is under a Creative Commons Attribution 4.0 International (CC BY 4.0) license.
I edited the dataset to contain a UUID for every customer. I also created 100 rows of fake customer data using the Python package Faker (https://faker.readthedocs.io/en/master/). All data used can be found in the repository for this demo.
The AWS Services Used in This Demo
- Amazon Athena
- Amazon Kinesis
- Amazon S3
- AWS Glue
- AWS Lake Formation
AWS Glue is used for an extract-transform-load (ETL) job and data cataloging in the demo. While the data is physically stored in S3, Glue data catalog database and tables store metadata, like schema and serialization info, so the data can be queried with Amazon Athena.
In this demo, transaction data from the transaction dataset is sent to the Amazon Kinesis data stream with a Python script, e.g.:
python send_data_to_stream.py --stream-name transaction_data_stream --interval 5 --max-rows 10
The Terraform files will create the following simple infrastructure. In addition to the infrastructure below, the Terraform files include a Kinesis Firehose to put the raw transaction data to a separate S3 bucket. Feel free to delete this from the infrastructure or use it for your own testing.
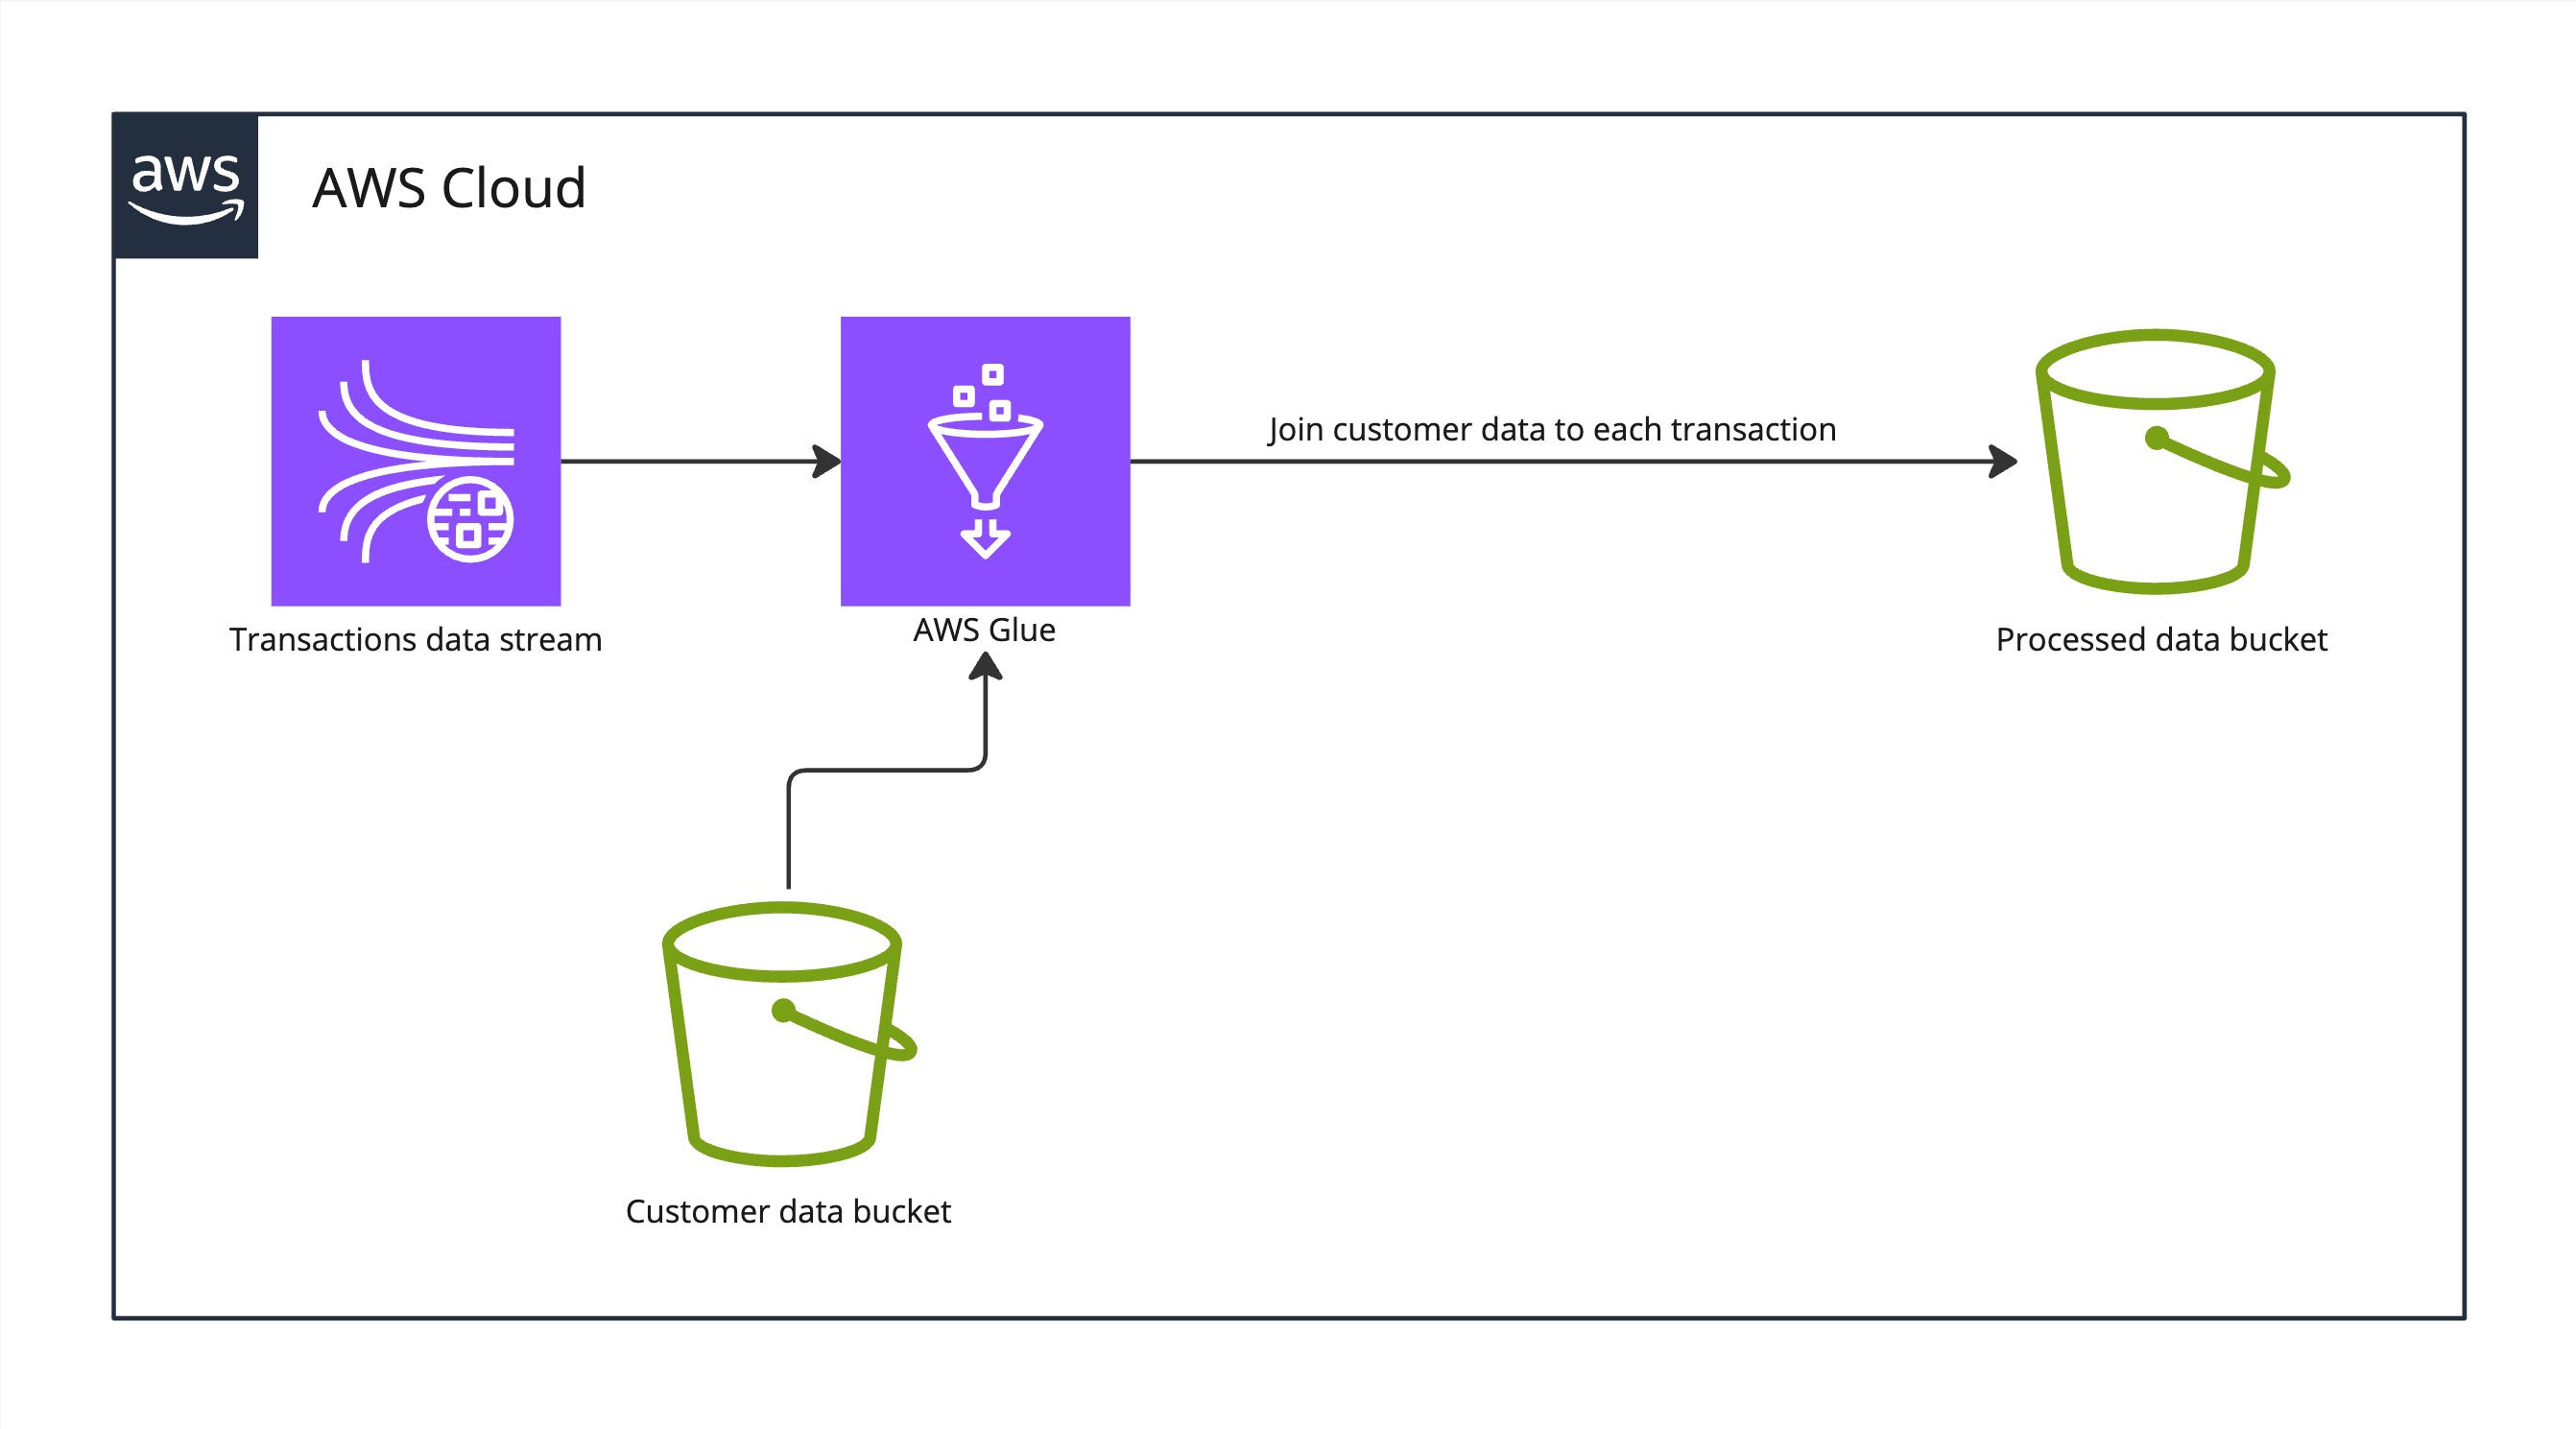
Infrastructure image
The AWS Glue job found in the demo’s repository (/glue_jobs/stream_join_job.py) reads the transactions from the steam-table data catalog and joins customer data from customers-table data catalog to each transaction based on the customer UUID. The resulting processed transactions are stored as parquet files. Below is a visualization of the ETL job.
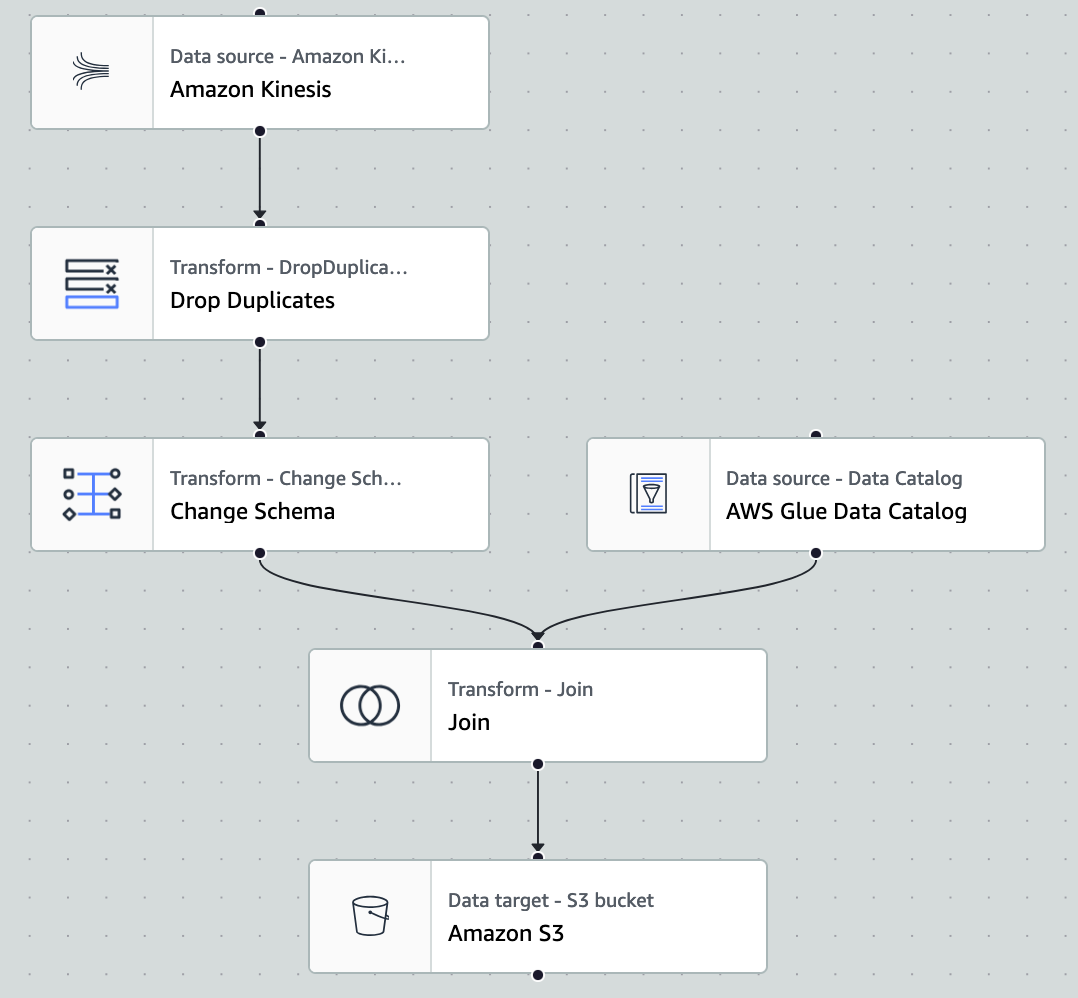
AWS Glue job to process transactions
Below is a snippet of Terraform for building the AWS Glue job in this demo. Setting for the Glue job and other Glue related infrastructure can be found in the Terraform files in the repository: /infra/glue.tf
resource "aws_glue_job" "stream_join_job" {
 name = "stream-join-job"
 role_arn = aws_iam_role.glue_role.arn
 glue_version = "4.0"
 worker_type = "G.025X"
 number_of_workers = 2
 max_retries = 0

 command {
   name = "gluestreaming"
   script_location = "s3://${aws_s3_bucket.glue_assets.bucket}/scripts/stream_join_job.py"
    }

 default_arguments = {
   "--continuous-log-logGroup"          = aws_cloudwatch_log_group.streaming_job_logs.name
   "--enable-continuous-cloudwatch-log" = "true"
   "--enable-metrics"                   = "true"
   "--TempDir" = "s3://${aws_s3_bucket.glue_assets.bucket}/temp/"
   "--job-language" = "python",
   "--enable-glue-datacatalog" = "true",
   "--job-bookmark-option" = "job-bookmark-disable"
    }
}
After streaming data is processed, an AWS Glue crawler is used to crawl the processed data S3 bucket, so its content can be stored in a data catalog table and then queried with Amazon Athena.

Amazon Athena query for 10 rows of processed data

Results of the Athena query
Even though IAM identities, with policies allowing them full access to S3 buckets, can see the files via S3 console, they cannot query the data using Amazon Athena due to AWS Lake Formation. Since we’re using Lake Formation, even an IAM user with administrator access has to grant themselves access to the database and tables for Athena to work. More on this later.
In the following chapter of this blog post I will demonstrate how you can use AWS Lake Formation to give fine-grained access to data stored in a data lake managed with Lake Formation.
Fine-grained Permissions with AWS Lake Formation
Lake Formation is a service by AWS that allows you to manage a S3 based data lake and what permissions different users have to the data stored there. The data lake in this demo consists of the AWS Glue data catalog database and tables. The actual data is physically located in S3 buckets.
In the infrastructure code provided in this demo, the IAM user or role that deploys the infrastructure is added as a data lake administrator (in addition to the IAM role for AWS Glue in this demo). Data lake administrator can view all metadata in the Data Catalog. They can also grant and revoke permissions on data resources to principals, including themselves. Permissions granted via Lake Formation are called Lake Formation permissions and they give more fine-grained permissions to the data sources when compared to IAM policies. In the Terraform example below, you can see how full Lake Formation permissions are given to the demo’s IAM role for AWS Glue.
resource "aws_lakeformation_permissions" "glue_database_permissions" {
 principal = aws_iam_role.glue_role.arn
 permissions = [ "ALL" ]
 permissions_with_grant_option = [ "ALL" ]
  database {
   name = aws_glue_catalog_database.demo_db.name
 }
}

resource "aws_lakeformation_permissions" "glue_tables_permissions" {
 principal = aws_iam_role.glue_role.arn
 permissions = [ "ALL" ]
 permissions_with_grant_option = [ "ALL" ]
  table {
   database_name = aws_glue_catalog_database.demo_db.name
   wildcard = true
 }
}
You can read more about the underlying access control from the AWS Lake Formation developer guide: https://docs.aws.amazon.com/lake-formation/latest/dg/access-control-underlying-data.html
The infrastructure code creates an IAM role called data-analyst-role which is meant to simulate a data analyst with limited permissions. Next we will look at how you can specify column or even row level access to the processed transaction data.
Granting Permissions with the Lake Formation Console
 From the Data lake permissions menu, you can grant access to the data analyst IAM role for example. Select “Grant” to give permissions to a principal.
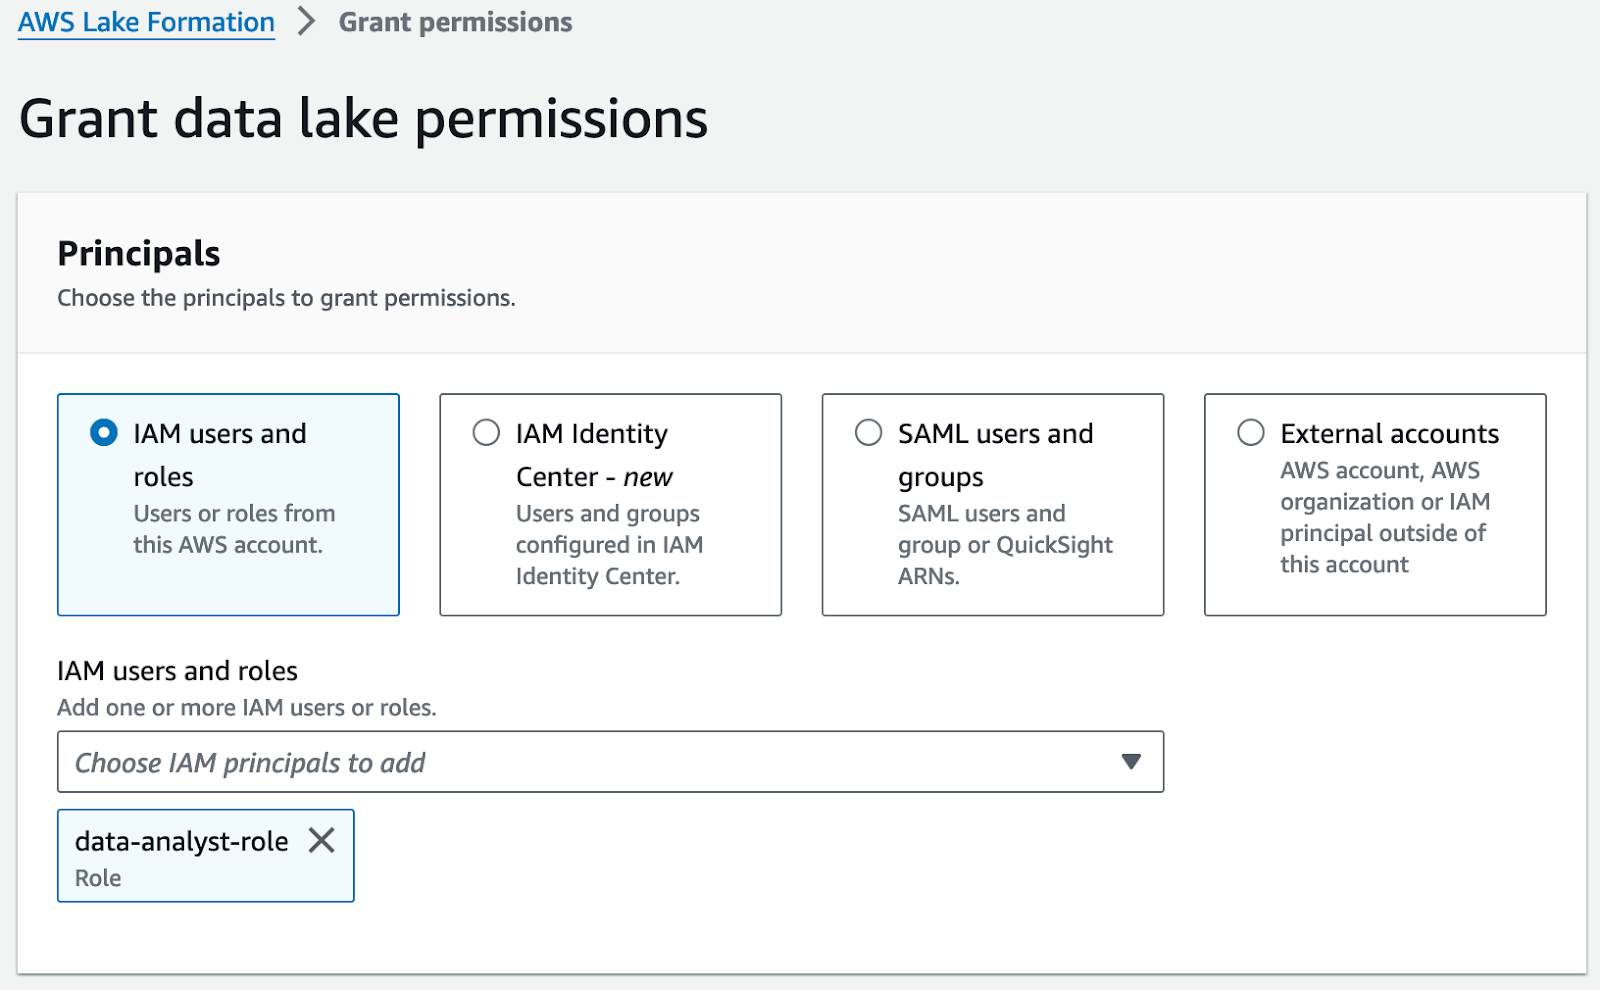 Here you can see all the different principals for which you can grant permissions. Note that you can even allow third-party AWS accounts, AWS organizations or IAM principals fine-grained access to data in your data lake.
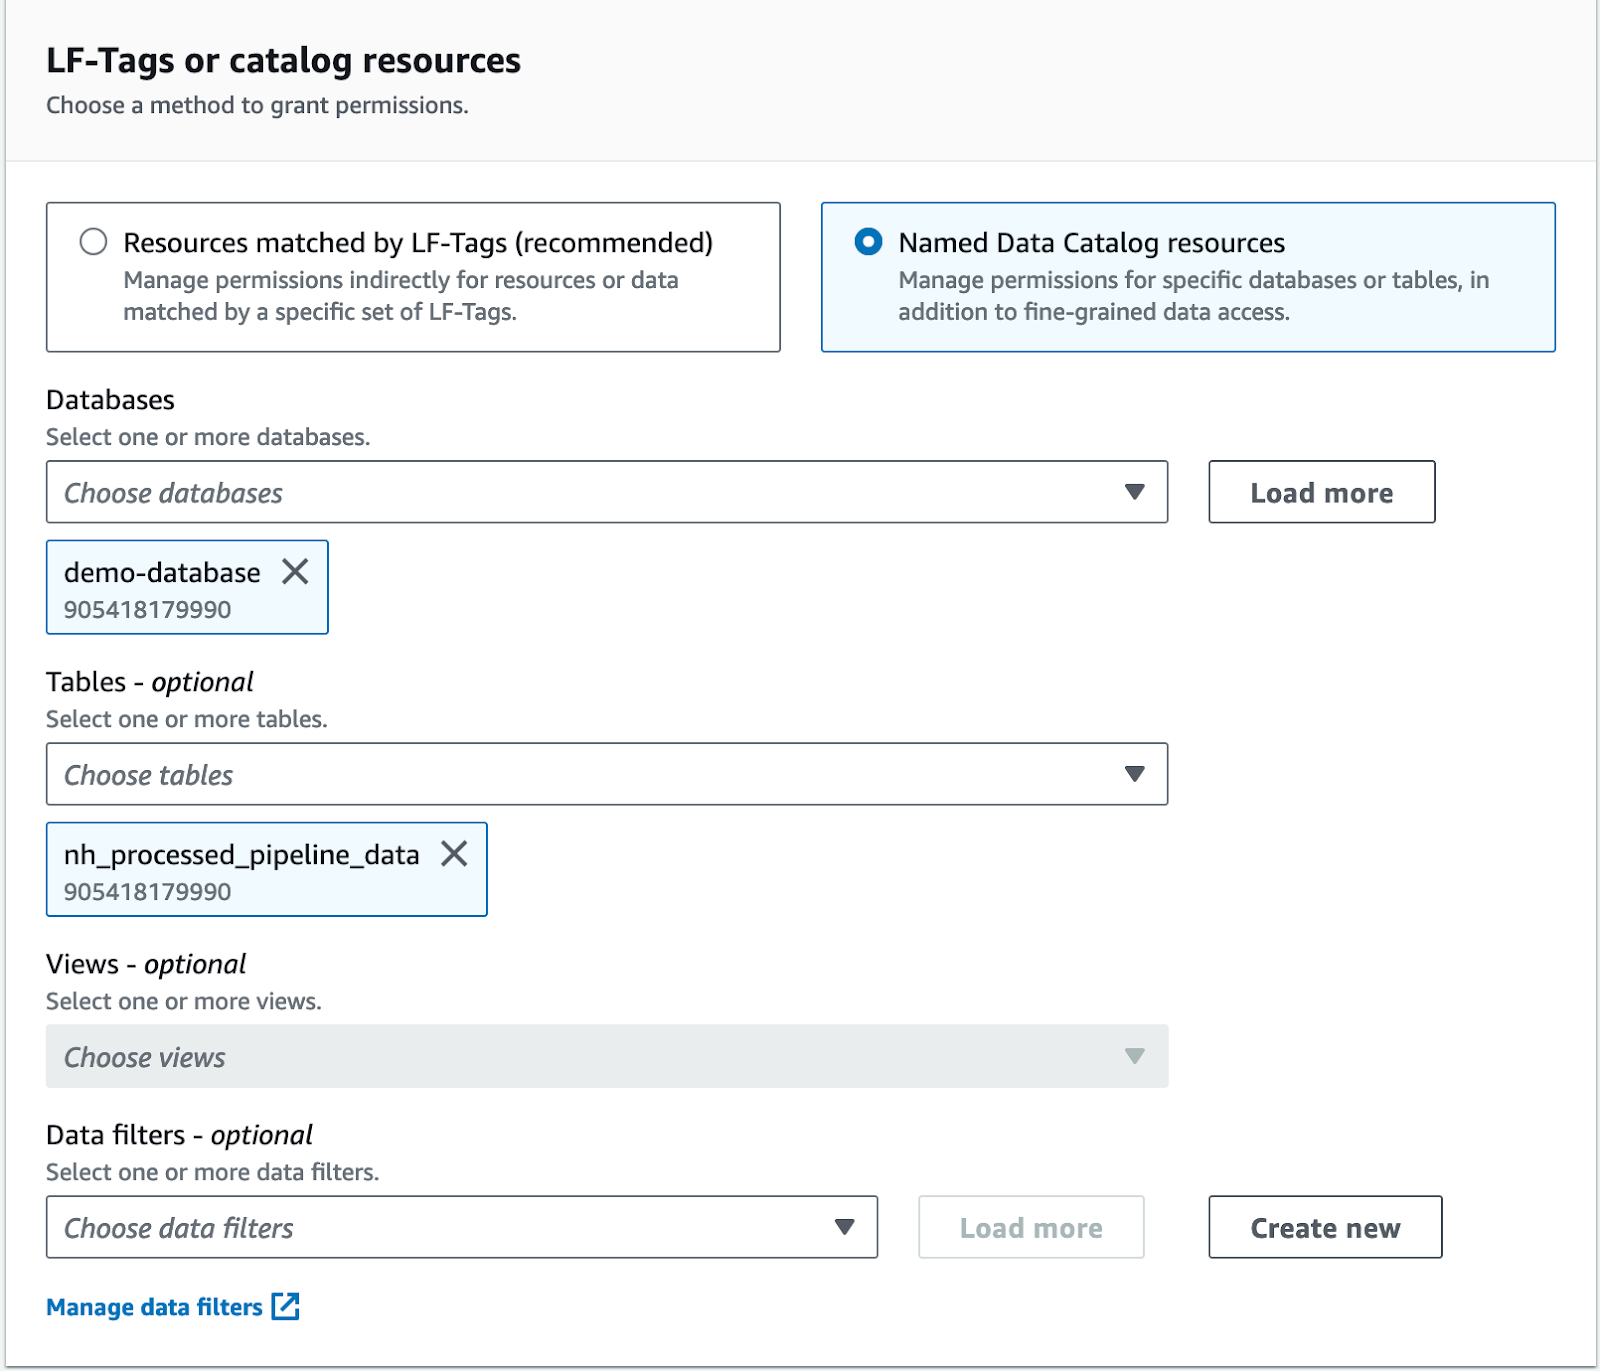 Permission can be managed for resources that are tagged with an user specified tag (called LF-tag in the Lake Formation console) or AWS Glue data catalog resources. Data filters allow you to filter the data using predefined Lake Formation filters but more on this later.
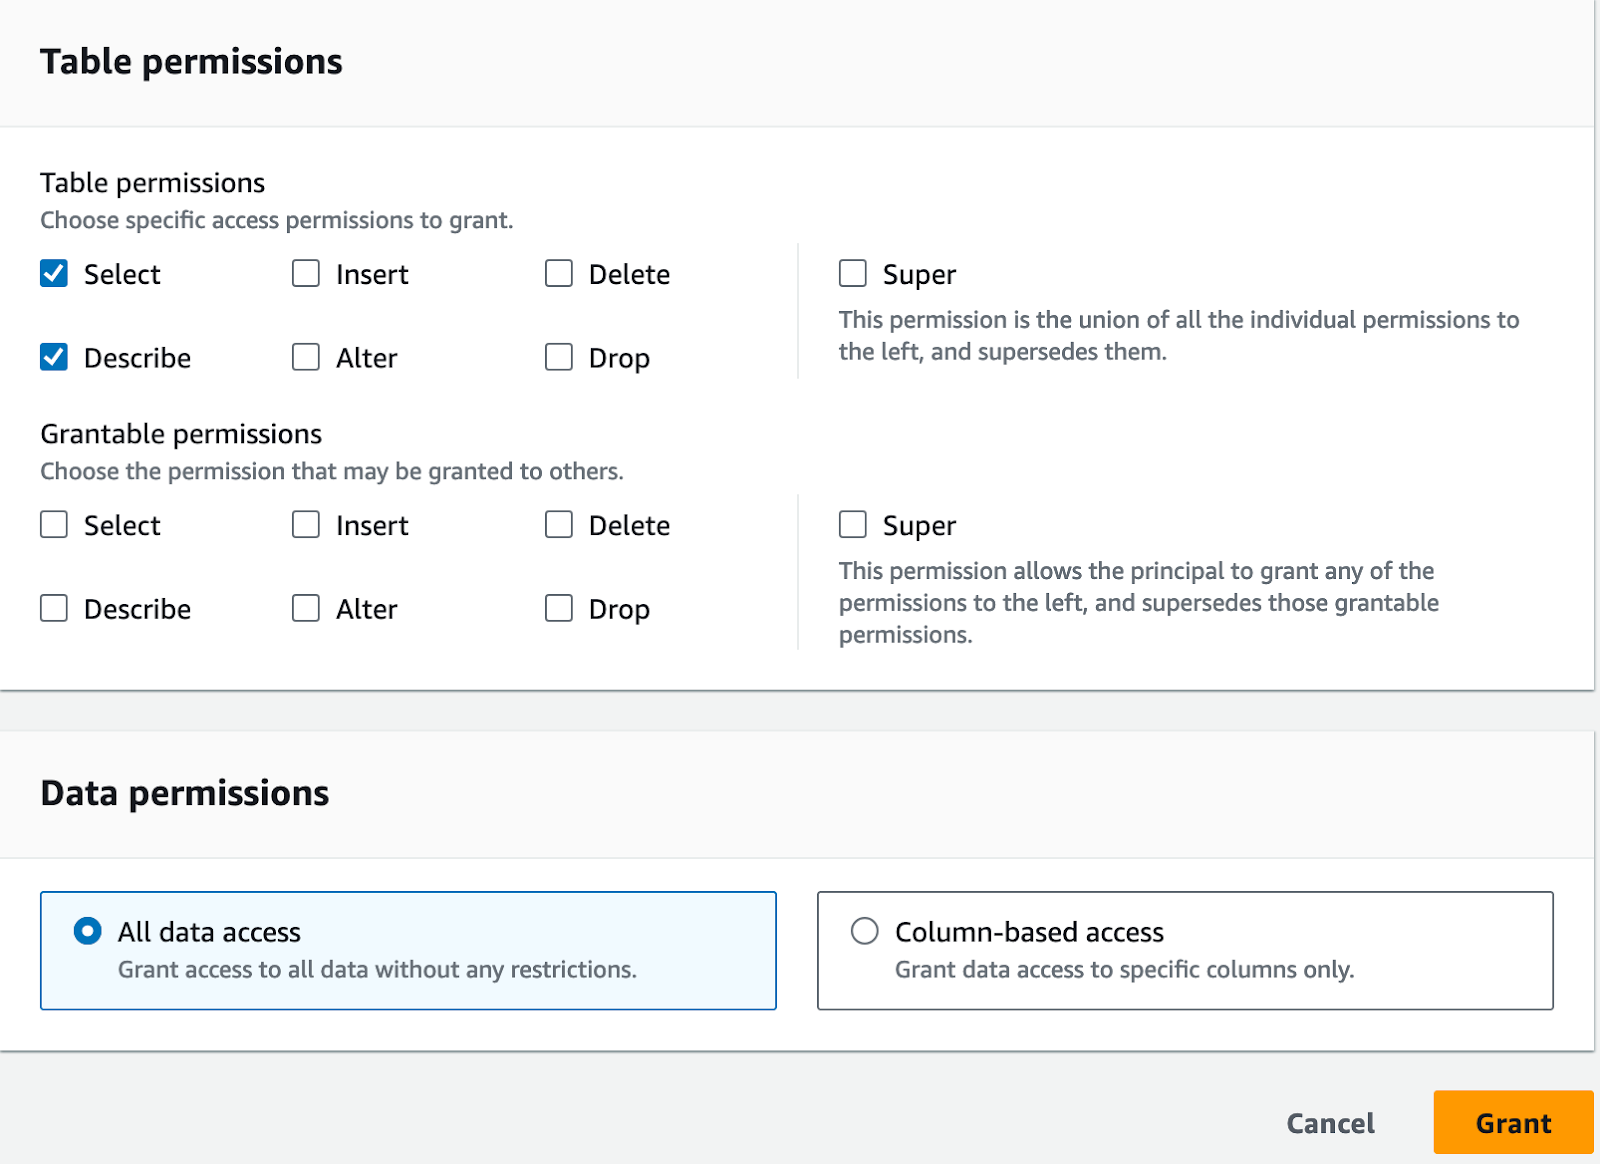 Lastly, you choose what permissions you want to grant the chosen principal. Note that you can allow the principal to pass the permissions on to others. Here is also a chance to decide what columns the principal has access to. Next I'll change over to Amazon Athena and see what data I can access now on the data analyst role.
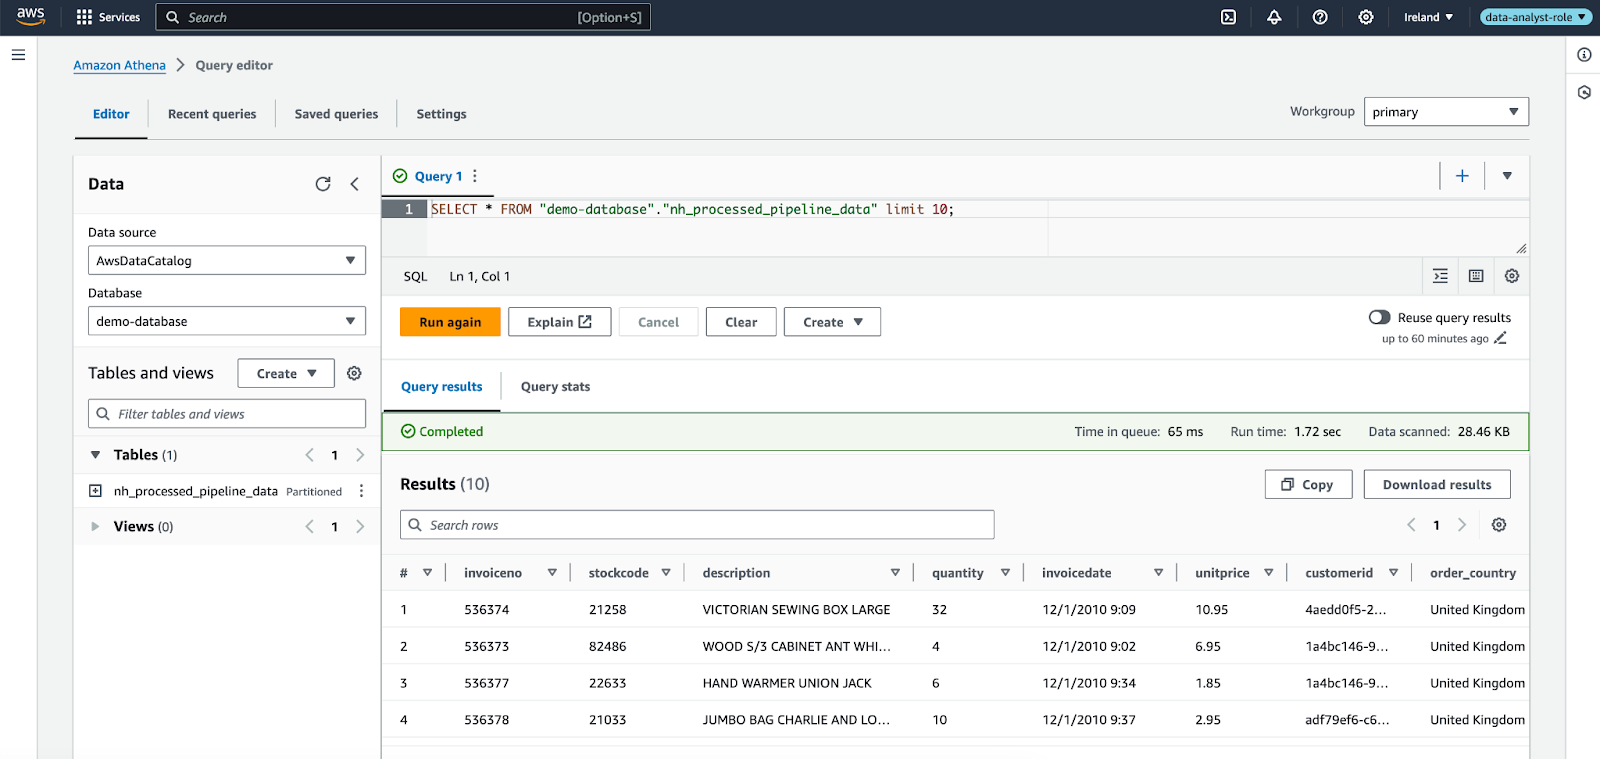 Notice how on the data analyst role I’m able to see only one data catalog table available for querying with Athena, even though several tables were created in the infrastructure. This is because the tables have been registered with Lake Formation and we gave the data analyst role only access to the one table shown in the screenshot above.
Next we will further restrict the permissions of the data analyst role, using data filter back in the Lake Formation console.
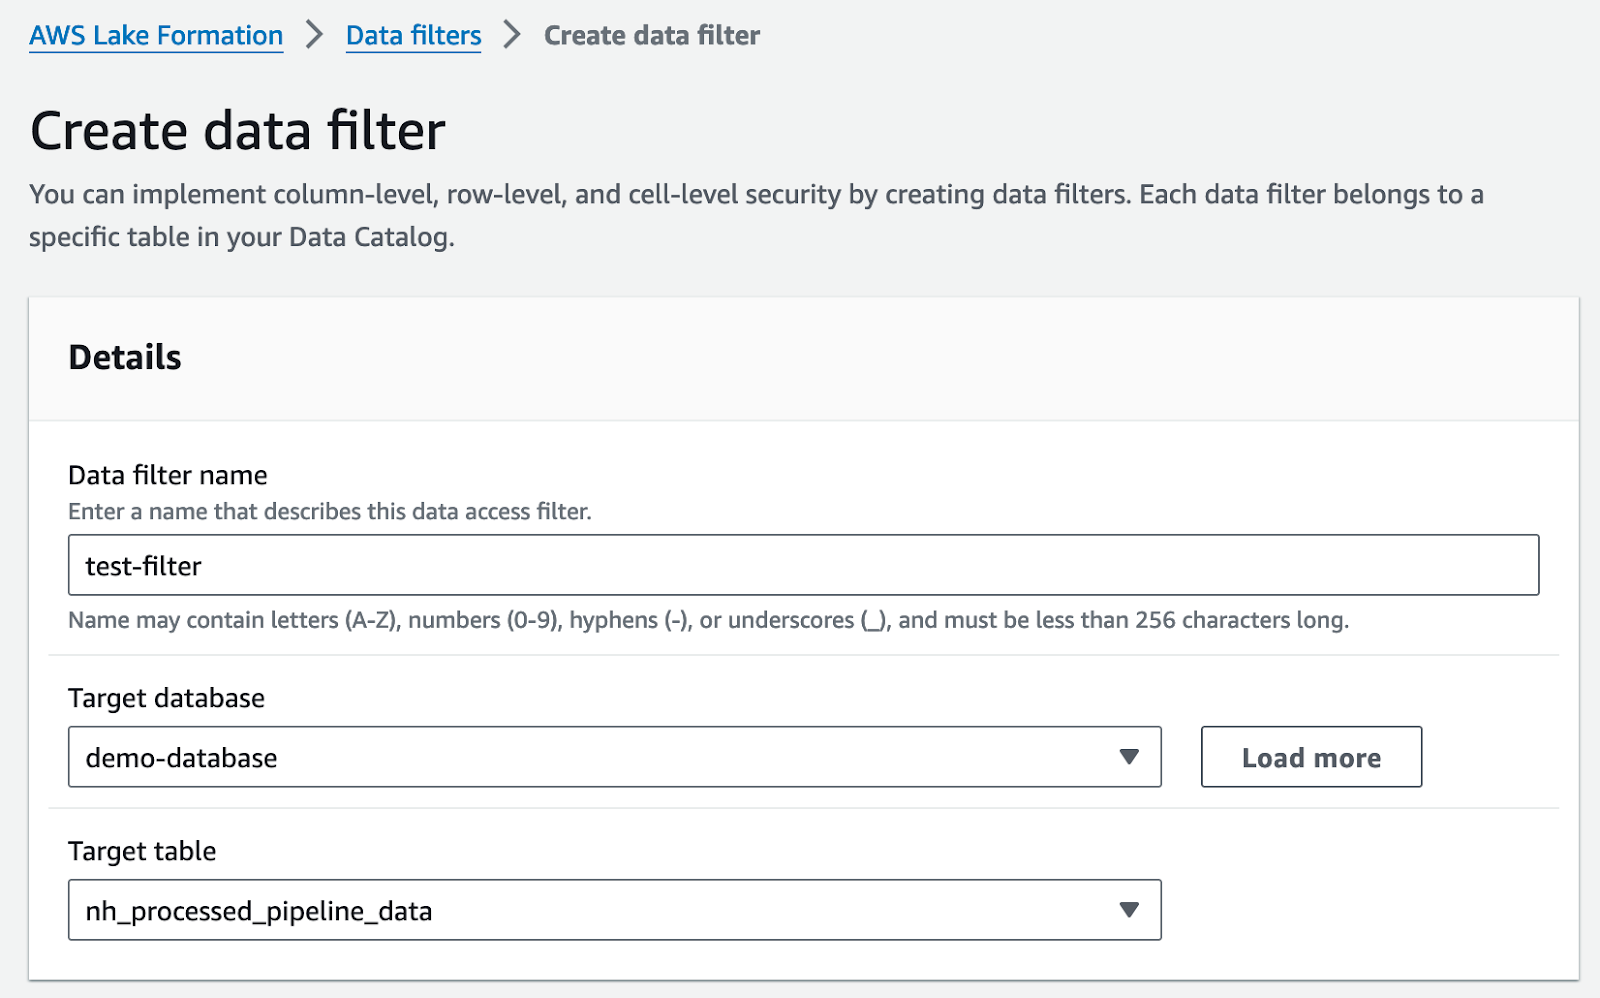 Choose data filters from the menu on the left. We’ll start by creating a data filter that filters out all but few columns from the processed data.
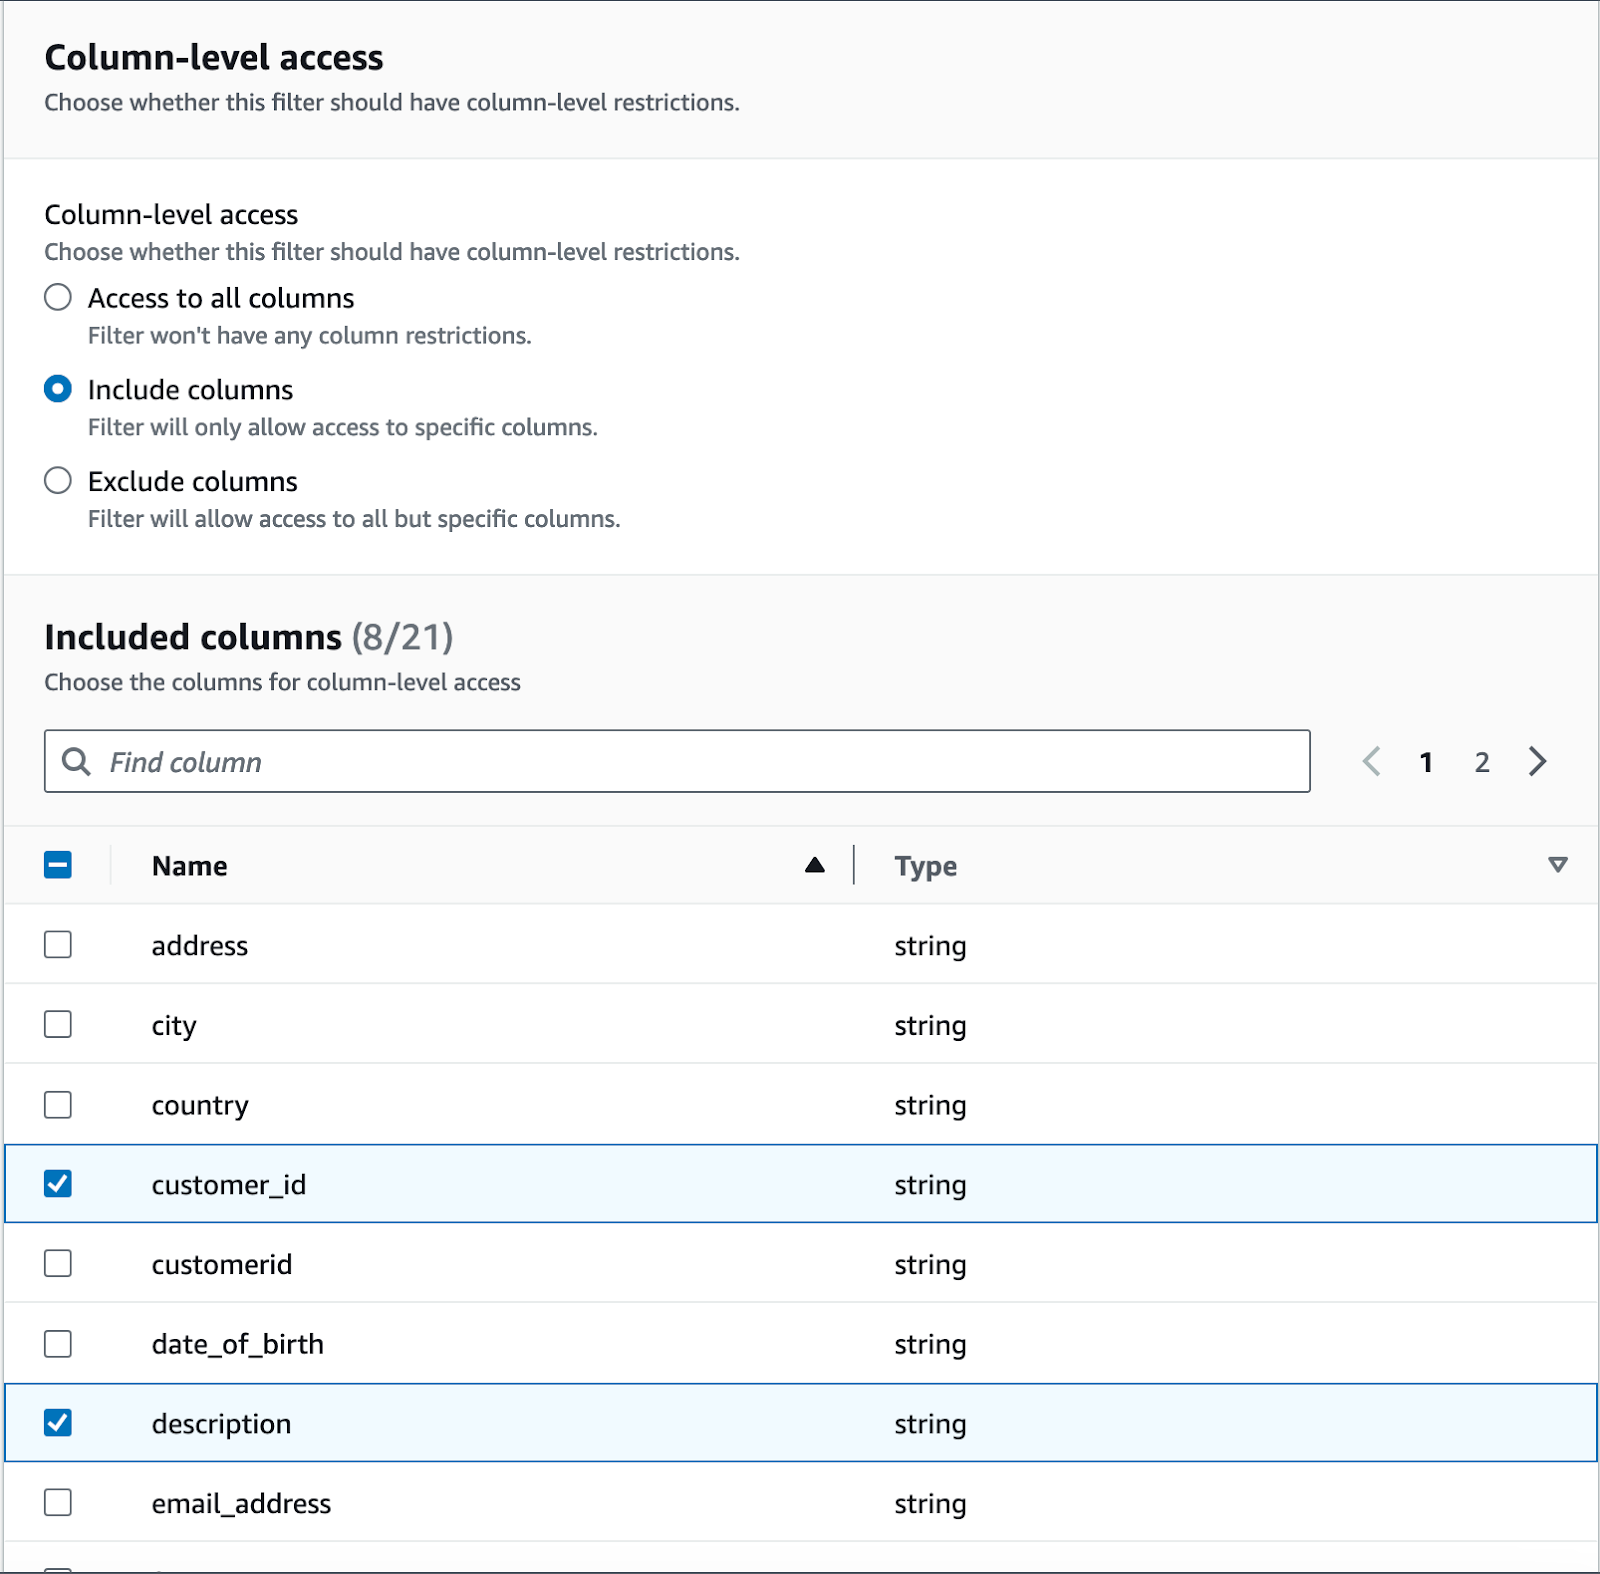 Next I'll select what column get past the filter to the data analyst.
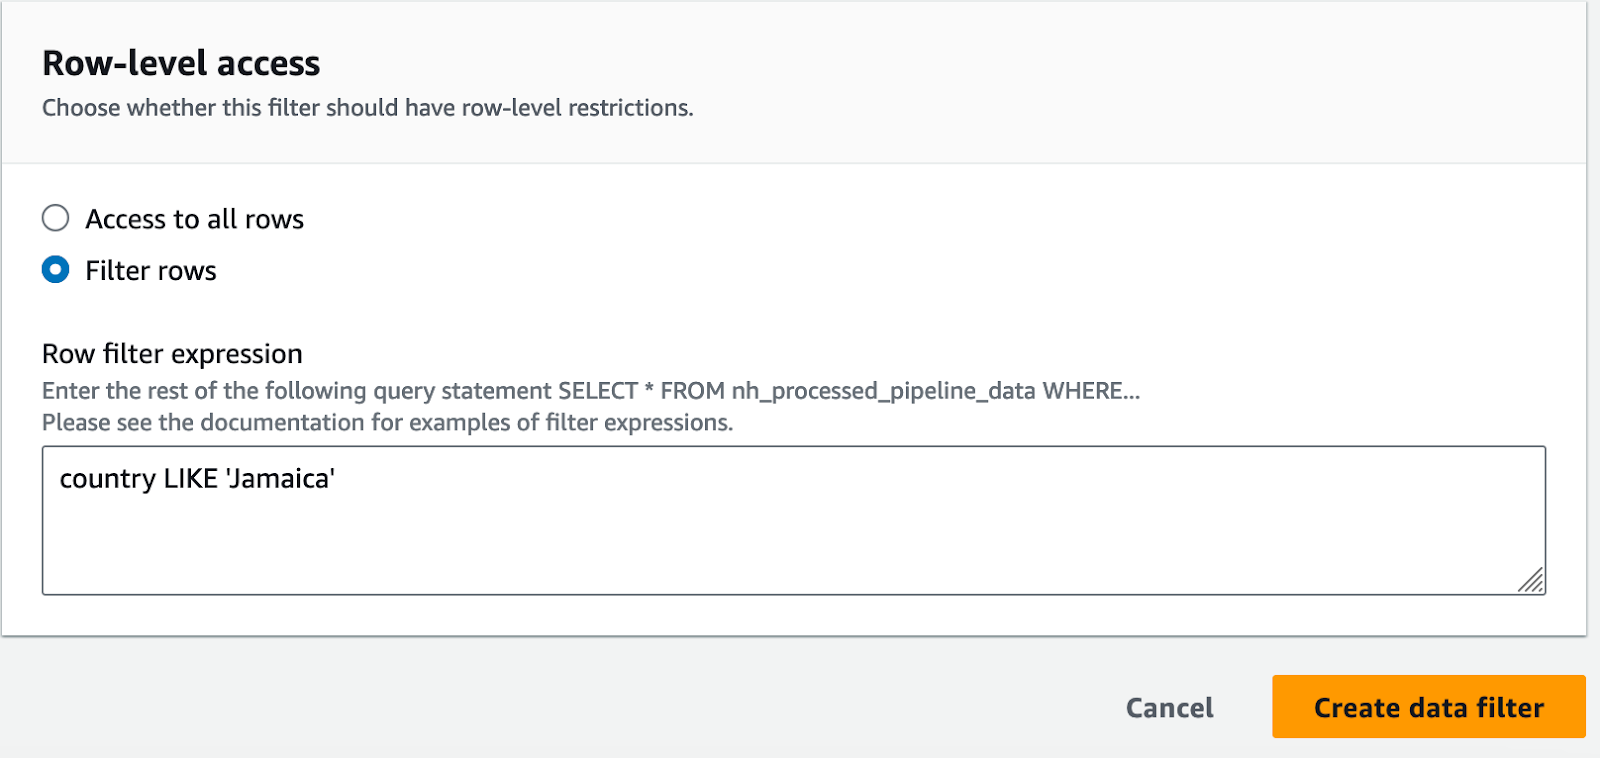 I will even restrict the data on the row-level and allow the data analyst role access to orders where the customer is from Jamaica
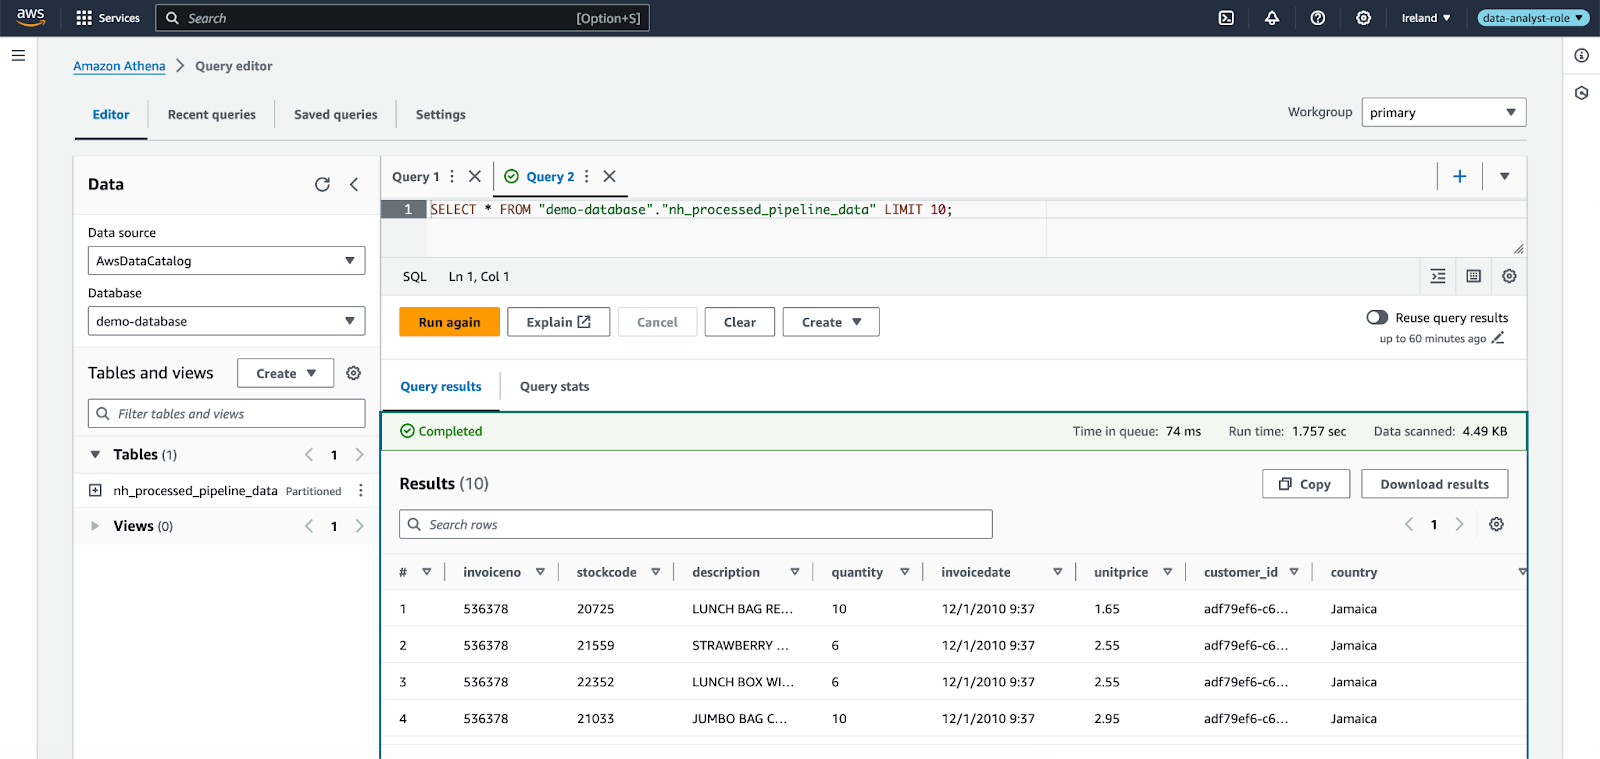 After the data filter is created, you need to revoke the old permissions and grant new permissions using the newly created data filter. After this, the same Athena query from earlier will result in rows with only the allowed columns included and where the country is Jamaica.
Tag-based Access Control and Hybrid Solutions
As mentioned earlier, Lake Formation allows you to also grant permission to resources based on tags. This allows you to utilize the benefits of Lake Formation in highly scalable environments. The problem with the method used in this demonstration (Named Resource Based Access Control or NRBAC) is that if we add more data sources, we need to specify permissions separately for each one of them. In that case, tag-based permissions are much easier to manage. For example you could tag all new data sources and give the data analyst read access to resources with the tag. This method allows you to give access to N many sources with just 1 permissions grant instead of granting permissions N times.
Tag-based (also referred as attribute-based) access control works the same way in Lake Formation as the NRBAC used in this demo. When combined with NRBAC, you can create fine-grained, scalable and efficient permissions to your data lake with tag-based access control. When using Lake Formation it is important to keep in mind that there are several different ways of granting permissions and it is worth exploring a hybrid solution.
Conclusion
This demonstration’s purpose is to showcase the basic usage of AWS Lake Formation but a great way to see what you can achieve with the service is to try it out for yourself. Feel free to clone or just take a look at the repository used to set up this demo. One thing not covered here is the possibility to grant Lake Formation permissions to users and identities outside the AWS account where the data lake is set up. This and a lot more can be achieved with Lake Formation.
When building a data lake with effective and easily manageable access control, it’s important to understand your use case and environment. AWS offers you excellent tools for managing permissions to different AWS services and resources in your environment. A real world use case for AWS Lake Formation could be to limit the access of different units of your organization based on their geographical location, I.g. let the French only see data relevant to France.
We here at NordHero have expertise in building data pipelines and data lakes. If you have any questions, please contact us and let’s schedule a meeting to discuss your company’s data needs.


