


If you’ve been working in the cloud ecosystem, you’re likely familiar with the classic serverless setup involving API Gateway, AWS Lambda, and DynamoDB. This trio offers an out-of-the-box solution that’s easy to set up, scales automatically, and is highly reliable for most use cases. But what if your application requires the complex querying capabilities, transactional support, and data relationships that only a relational database can provide? Perhaps you’ve also come to appreciate the benefits of using an ORM and now want to modernize your existing web app—currently running on EC2—by transitioning to a serverless architecture while keeping your relational database intact. How can this be achieved with Amazon RDS in a serverless setup?
In this guide, I will walk you through the setup, using a software stack that has gained popularity recently: Python, FastAPI, and SQLAlchemy. This stack should provide a solid demonstration of a real-world application. As for its performance and capabilities in action, that’s a topic for a future article, which may be explored later
Things to consider with Amazon RDS & Lambdas
When integrating Amazon RDS with AWS Lambda, there are several key considerations to keep in mind. To enhance security, it’s common practice to deploy RDS within a VPC in private subnets. In this setup, it is important to make sure that your Lambda functions are also configured to run within the same VPC to minimize network latency and maintain secure communication.
Lambda Layers can significantly improve the performance of your Lambda functions by reducing cold start times and minimizing deployment package sizes. Layers allow you to reuse common libraries and dependencies without bundling them with each function, reducing the amount of code that needs to be loaded and initialized, which leads to faster execution.
Managing database credentials is another critical security consideration when using RDS with Lambda. It’s essential to securely manage these credentials, as one option using AWS Secrets Manager, and ensure that your Lambda functions operate with the least privilege necessary to interact with the database.

Image generated with Amazon Bedrock
One of the most significant challenges with using RDS in a Lambda environment is database connection management. Unlike traditional server environments, Lambda functions are ephemeral and can spin up thousands of instances simultaneously, potentially overwhelming your database with connections. For applications with a large user base or APIs with high request rates, this can quickly become a bottleneck. To mitigate this, you can limit concurrent executions or use libraries like SQLAlchemy to manage connection pooling. However, in most cases, it’s advisable to utilize RDS Proxy, which helps efficiently manage and pool database connections, preventing overload.
RDS Proxy manages multiple connections efficiently
RDS Proxy manages a pool of connections to the RDS database that can be reused across multiple Lambda function invocations, making it particularly useful for applications with unpredictable workloads or services that frequently open, close, or keep database connections idle. By reducing the overhead of establishing new connections, RDS Proxy helps maintain the number of active connections within the database’s limits, even if your database instance has a lower connection capacity
The size of your RDS instance plays a crucial role in determining the number of concurrent connections it can handle. Larger instances with more memory can support a higher number of connections. For instance, in PostgreSQL, the maximum number of connections is governed by the max_connections parameter, which can be set between 6 and 8,388,607. The default value for connection limit is calculated with following formula:
LEAST({DBInstanceClassMemory/9531392}, 5000)
However, calculating it yourself is challenging because the value of DBInstanceClassMemory isn’t directly available in the documentation. The most accurate way to determine the maximum connection limit is to create the instance first and then run the following command for the database:
select * from pg_settings where name='max_connections';
For this setup, I used an db.r5.large instance with 16 GiB of memory, which provided a maximum of 1,704 connections. By comparison, the smallest supported instance, db.t3.medium, with 4 GiB of memory, allowed approximately 400 maximum connections. Whether these limits are sufficient depends on your application’s needs, but in a Lambda context, these numbers may be on the lower side.
Beyond connection limits, there are other quotas and limitations to consider before integrating RDS Proxy into your project. One key consideration is ensuring that your database engine and version are supported by RDS Proxy, as it currently only supports MySQL, PostgreSQL, and MariaDB.
Just like RDS, RDS Proxy can be integrated with Secrets Manager to securely store database credentials in a centralized location, eliminating the risk of exposing them in your source code. You can easily access these credentials through the AWS SDK within your Lambda function, ensuring secure retrieval. Alternatively, you can opt for IAM-based authentication with RDS Proxy, which enhances security by allowing you to manage access through AWS Identity and Access Management (IAM) roles instead of relying on static credentials.
Utilizing Python, Fastapi & SQLalchemy in Lambda runtime
Python’s simplicity, ease of use, low memory consumption, and fast startup times have made it a popular choice for AWS Lambda runtimes. Additionally, Python’s rich ecosystem supports a wide range of libraries for data analytics, machine learning, and backend development. Many of you are likely familiar with tools like Pandas, TensorFlow, and web frameworks such as Django and Flask.
While Django and Flask have long been popular for building APIs, FastAPI, a newer contender, has recently gained attention. FastAPI is designed for high performance and ease of use, providing concurrency and response times comparable to Node.js and Go. It features automatic generation of interactive API documentation through Swagger UI and excels in handling complex data validation and serialization with minimal boilerplate code. FastAPI also integrates seamlessly with SQLAlchemy, making it a natural choice for those who prefer using ORMs. But how can one run these in Lambda and, FastAPI being an self-contained API, what kind of implications do these tools have for API Gateway usage?
ASGI (Asynchronous Server Gateway Interface) is a standard for asynchronous communication between web servers and Python applications, serving as an alternative to WSGI (Web Server Gateway Interface), which is used for synchronous applications. FastAPI is built on ASGI, but AWS Lambda natively supports WSGI. To bridge this gap, use Mangum, a library that adapts ASGI applications to AWS Lambda.
For efficient database connection management in AWS Lambda, it is better to use connections outside the Lambda handler. This approach allows connections to be reused across multiple invocations within the same execution environment, improving performance and reducing latency. For instance, initializing the database engine and session outside the handler lets subsequent requests reuse these connections, minimizing the overhead of creating new ones.
As an API framework, FastAPI provides its own robust capability for HTTP request routing and integrating various business logic and middleware services to the requests. To make FastAPI work as you want with API Gateway in a serverless setup, you willl need to configure API Gateway to route requests to FastAPI. I will explore these setup details and other implementation aspects in the next section.
Implementation Example

Image generated with Amazon Bedrock
To showcase the power of relational databases in a serverless architecture, I set up a stack to explore its functionality. The source code is available here. You can clone it, and running the setup on your own should be straightforward.
In the upcoming sections, I will walk you through the implementation using the source code, highlighting key considerations for deploying RDS, FastAPI, and SQLAlchemy in a serverless environment. And when it comes to representing infrastructure as code, Terraform, a well-established tool, demonstrates its many strengths.
Resources layed out with Terraform
The infrastructure is managed using Terraform, offering a robust Infrastructure as Code solution for seamless deployment and management. The setup includes the following AWS resources:
- A Virtual Private Cloud (VPC) with private subnets
- Amazon Aurora RDS for scalable relational database management
- RDS Proxy for efficient database connection handling
- Database credentials securely stored in Secrets Manager
- Amazon API Gateway for API routing
- AWS Lambda & Lambda Layers for executing serverless functions
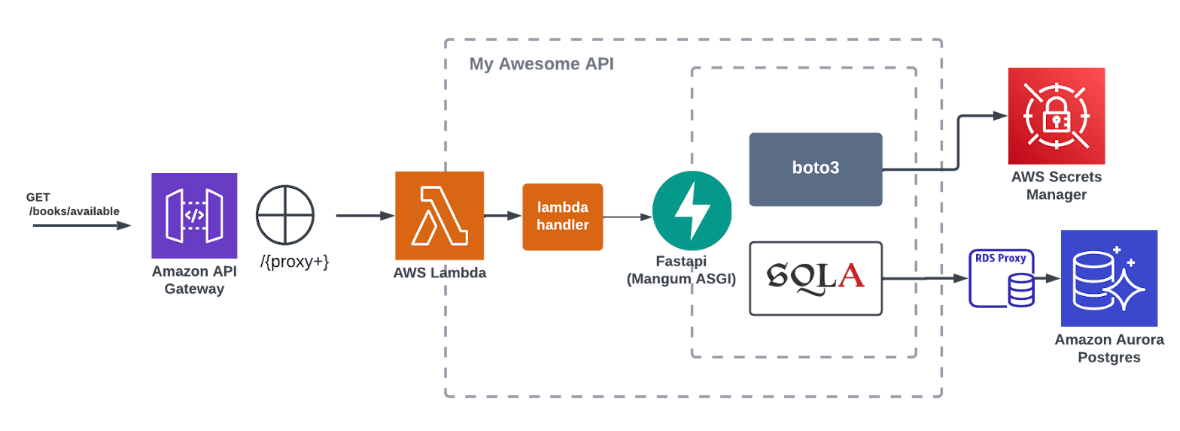
Serverless Architecture with RDS
RDS Proxy configuration
All Lambda functions, RDS instances, and RDS Proxy are deployed within the same VPC and are secured through security groups. This setup not only enhances the security of the resources by isolating them within the VPC but also minimizes latency by keeping network communication internal. Additionally, this configuration ensures that your serverless functions can efficiently interact with the database without exposing them to the public internet.
resource "aws_db_proxy" "my_awesome_rds_proxy" {
  name                   = "my-awesome-rds-proxy"
  debug_logging          = true
  engine_family          = "POSTGRESQL"
  idle_client_timeout    = 60
  require_tls            = false
  role_arn               = aws_iam_role.rds_proxy_role.arn
  vpc_security_group_ids = [aws_security_group.rds_proxy_sg.id]
  vpc_subnet_ids         = data.aws_subnets.default.ids

  auth {
    auth_scheme = "SECRETS"
    description = "my-awesome-rds-proxy"
    iam_auth    = "DISABLED"
    secret_arn  = aws_secretsmanager_secret.db_credentials.arn
  }
}

resource "aws_db_proxy_default_target_group" "my_rds_proxy_target_group" {
  db_proxy_name = aws_db_proxy.my_awesome_rds_proxy.name

  connection_pool_config {
    connection_borrow_timeout    = 60
    max_connections_percent      = 100
    init_query                   = "" # Postgres do not support this
    max_idle_connections_percent = 50
    session_pinning_filters      = ["EXCLUDE_VARIABLE_SETS"]
  }
}
In the RDS Proxy configuration, I set the engine family to POSTGRES and chose the auth scheme as SECRETS, allowing the proxy to fetch database credentials securely from Secrets Manager. While IAM authentication is another excellent option for securing database access, for this example implementation, using Secrets Manager was more convenient.
For simplicity, TLS was not enabled in this setup; however, enabling TLS is a best practice in production environments. Additionally, while this implementation doesn’t utilize read-only endpoints, incorporating them in your application can significantly reduce the load on the primary writer instance by offloading read queries. Keep in mind, though, that there may be some replication lag with read replicas, so it’s important to consider this when designing your application’s data access patterns.
For the proper and efficient functioning of RDS Proxy there are some important configurations for target groups:
connection_borrow_timeout, max_connections_percent, init_query,
max_idle_connections_percent and session_pinning_filters
First of all when using Postgres the init_query needs to be set empty.
connection_borrow_timeout – The maximum amount of time that RDS Proxy will wait to borrow a connection from the connection pool when it is full. This setting only applies when the proxy has opened its maximum number of connections and all connections are busy with client sessions.
max_idle_connections_percent – This parameter helps to keep the idle connections in control. It defaults to 50% of the max available connections. If you have a high max connections setting and experience sudden spiky traffic, it’s advisable to keep this value low to prevent a large number of connections from remaining idle unnecessarily.
max_connections_percent – This value is expressed as a percentage of the max_connections setting for the RDS DB instance used by the target group. It’s crucial to control this parameter if you want to reserve a portion of the connections for direct instance access, bypassing the proxy, or if you manage multiple target groups.
session_pinning_filters – Lastly, session pinning can be a tricky feature to manage. Its primary use is to maintain a consistent view of the data, which is crucial for example scenarios involving transactions. However, it can also pose challenges: when multiple transactions require session pinning, it can lead to a shortage of available connections, potentially causing performance issues and reducing overall efficiency.
API Gateway configuration
In API Gateway, we implemented proxy routing by simply defining following in API gateway terraform module:
module "api_gateway" {
  [...]

  # Routes & Integration(s)
  routes = {
    "ANY /{proxy+}" = {
      integration = {
        type = "AWS_PROXY"
        uri  = module.lambda_function.lambda_function_arn
      }
    }
  }

  [...]
}
It is important to note that this example implementation lacks an authorization layer. For a production setup, you would for example integrate Amazon Cognito as an authorizer in API Gateway to manage API access control properly. FastAPI also offers good support for OAuth, allowing you to leverage OAuth scopes for more granular access control within your routes.
Setting up Lambda Layers can be a bit cumbersome, but the performance improvements they offer make the effort worthwhile. In this setup, I create Lambda Layers locally by first installing the Python runtime requirements in a dedicated layer folder, and then building the layer directly using Terraform’s lambda_layer_local module. Typically layers are uploaded to S3 before applying to Lambda but here I want to make a shortcut.
module "lambda_layer_local" {
  source = "terraform-aws-modules/lambda/aws"

  create_layer = true

  layer_name               = "my-lambda-layer"
  description              = "My amazing lambda layer (deployed from local)"
  architectures            = ["x86_64"]
  compatible_architectures = ["x86_64"]

  source_path = "${path.module}/../infra/layers/"
  depends_on  = [null_resource.create_layer]
}
Setting up Fastapi & SQLAlchemy
Configuring and setting up FastAPI is easy, but you need to know what you are doing when you are using it in the Lambda context. As already discussed earlier, the place where the database connection is established matters. To minimize the number of connections opened, it’s best to establish the connection outside the Lambda handler.
# Establish database connection outside lambda handler.
# After initialization this singleton database instance
# will be reused as fastapi dependency
my_awesome_database = resources.get_database(
   use_proxy=settings.USE_PROXY, use_secret_cache=aws_secret_cache
)

handler = Mangum(app, lifespan="off")
Writing routes with FastAPI is a pleasure. The framework’s decorator-based approach allows you to define routes concisely, resulting in clean and readable code.
@router.get("/books/{book_id}", response_model=response.Book)
def get_book(book_id: int, session: SQLSession = Depends(resources.database_session)):
    book = session.query(sql.Book).filter(sql.Book.id == book_id).first()
    if book is None:
        raise HTTPException(status_code=404, detail="Book not found")
    return response.Book.model_validate(book)


@router.get("/books/available/", response_model=List[response.Book])
def get_available_books(session: SQLSession = Depends(resources.database_session)):
    # Query to get books that do not have any loans
    subquery = session.query(sql.Loan.book_id).subquery()
    available_books = (
        session.query(sql.Book)
        .outerjoin(subquery, sql.Book.id == subquery.c.book_id)
        .filter(subquery.c.book_id == None)
        .limit(10)
        .all()
    )
    return parse_obj_as(List[response.Book], available_books)
While SQLAlchemy might seem complex and overwhelming to first-time users, it is effective for managing database interactions and defining well-structured relationships, especially in medium to large-scale applications. Its object-oriented querying approach is elegant. As seen in the code example above, ORM simplifies CRUD operations, enhancing both code readability and maintainability. This abstraction makes complex queries and data manipulations much more straightforward.
The schema models an imaginary library system where borrowers can loan books and leave reviews. I aimed to design an example that demonstrates typical SQL relationship patterns, showcasing how SQLAlchemy handles complex database structures.
class Book(Base):
    __tablename__ = "books"

    id = Column(Integer, primary_key=True, autoincrement=True)
    title = Column(String, index=True)
    published_date = Column(Date, nullable=True)

    # One-to-One relationship with Loan (a book can have only one active loan)
    loan = relationship(
        "Loan", back_populates="book", uselist=False, cascade="all, delete-orphan"
    )

    authors = relationship(
        "Author", secondary=book_author_table, back_populates="books"
    )

    # One-to-Many relationship with Review
    reviews = relationship("Review", back_populates="book")


class Review(Base):
    __tablename__ = "reviews"

    id = Column(Integer, primary_key=True, autoincrement=True)
    book_id = Column(Integer, ForeignKey("books.id"), nullable=False)
    borrower_id = Column(Integer, ForeignKey("borrowers.id"), nullable=False)
    rating = Column(Integer, nullable=False)
    comment = Column(Text, nullable=True)
    review_date = Column(Date, nullable=False)

    # Many-to-One relationship with Book
    book = relationship("Book", back_populates="reviews")
    borrower = relationship("Borrower", back_populates="reviews")
The outcome after Terraform apply
Now it’s time to run our Terraform scripts and deploy the code to the cloud. Once everything is set up, we can explore our API documentation and enjoy our serverless API powered by Amazon RDS. The RDS Proxy will handle the load efficiently, and in the next article, we will dive deeper into its performance and see it in action!
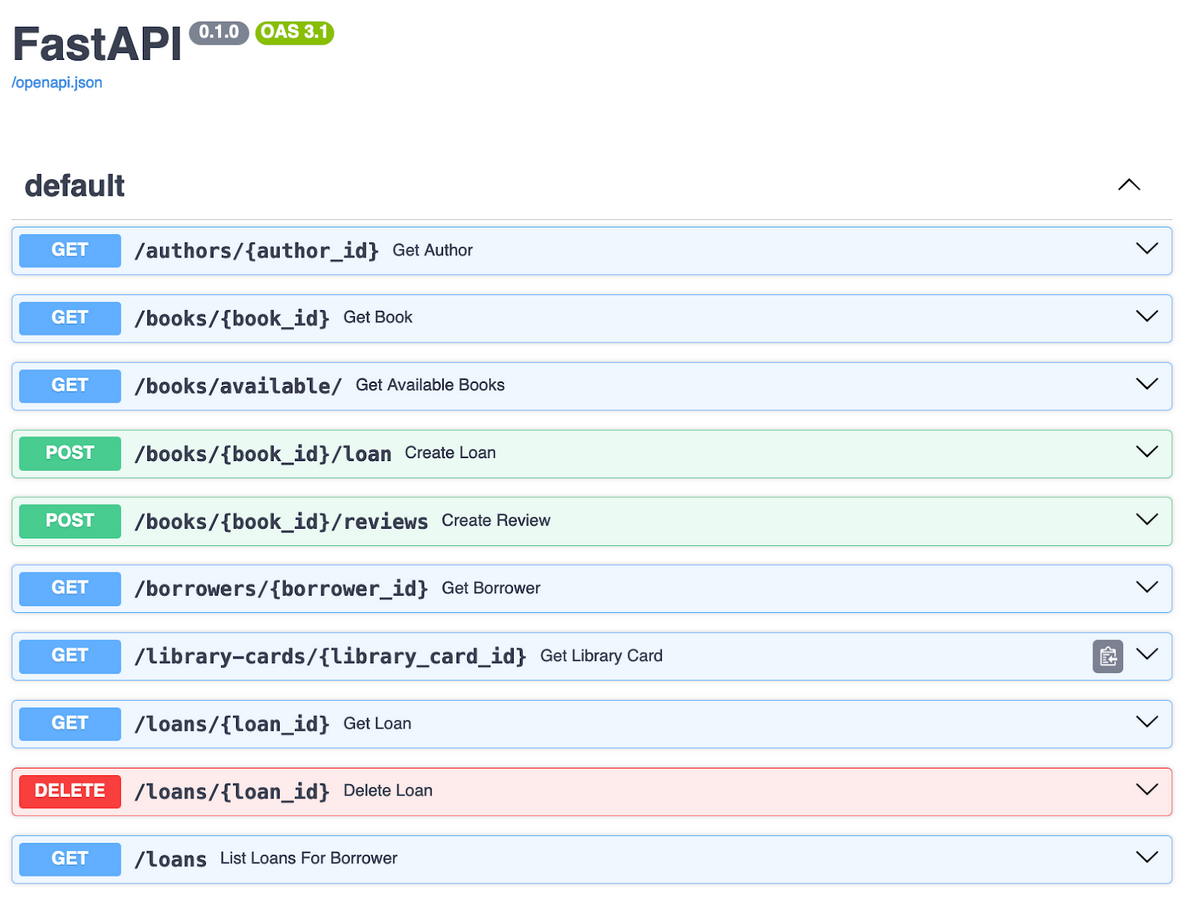
Serverless API powered by Amazon RDS